 Months ago I promised you a tutorial for the Make & Take I did. I never did.............. So it's about time. Have fun!
Supply list:
- A lip balm, Chapstick, Lip Smackers or something similar. I love the Lip Smackers because they come in all different colors.
- About a half a sheet of cardstock
- A tiny piece of patterned paper
And some stuff to embellish like rub-ons, maybe a charm or something. This project can be easily adapted to a gift for a boy, man, teacher or whomever you like to give it to.
If your Lip Smackers or Chapstick has a colored top you might want to match your cardstock and patterned paper to it.

This is a great and very affordable gift which also gives you the opportunity to get rid of some of those scraps we all have collected over the years! I think I can make about a 1000 of lip balm holders to get rid of my scraps, LOL
Okay, here we go. If something is not clear please leave me a comment and I'll get back to you on this!
Step 1:
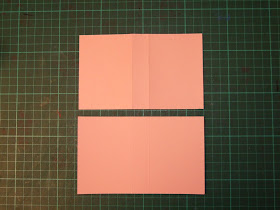
We now need to cut our cardstock. We need two pieces (exactly the same) of 3 1/2" by 5 3/4".Score both of those pieces at 2 1/2" and 3 1/4" on the short side of the cardstock (so from top to bottom on the 3 1/2" side)  Step 2:
 Step 2:
We need to make two cuts in only one of the pieces of cardstock. (JUST ONE!) The first cut (bottom) has it's center point on top of the right score line and goes until the middle of the cardstock. (length about 3/4")If you want to know where this cut has to start (height wize): Put your lip balm stick in the middle and mark the bottom of with a pencil. This is going to be the top part of your cut. Your lipbalm is going to lean on this cut later on. The second cut also has it's centre at the same point but the cut is about twice the size (about 1 1/2") Height wize is't going to be in the middle.The whole thing will look like this:


Step 3:
We now need to choose our ribbon (about 6" for each side) and attach that with tape on the left and right side of the cardstock. After that you have to adhere the two pieces of cardstock together. The piece of cardstock with no cuts will be your outside cover and the one with the cuts is going to be on the inside. BE CAREFUL: FIRST put your ribbon in there and only put adhesive on the side which has the cuts and not on top of your two cut strips (I did that the first time and everything was stuck together!)
Step 4:
Round off the outside corners with your corner rounder. You can now decorate the inside and outside as you please. I used a piece of patterned paper slightly smaller than the cardstock and decorated that with some circles (both normal and scallopped) in different colors cardstock and the same patterned paper that I used to cover my holder. I adhered the circles together with foam tape to give it a more 3D look. I put a rub-on on the last circle (Mine is from Scenic Route) and put the circles on my holder. I also put rub-ons on the spine and on the inside

Step 5:
Last step: Your Chap stick!Cut a piece of patterned paper just as long as your Chap stick but make sure it won't cover the turning part or the lid! Make it about 1/8 of an inch wider than your stick. The best way to adhere it to your Chap stick is to run it through your Xyron. If you don't own a Xyron, make sure there's adhesive all over the paper. When you've wrapped it around your chap stick cover the overlapping part of your paper with Scotch tape (That's invisible) You can add a rub-on or sticker to the stick.
 The only thing that needs to be done: Give it away! I can't wait to see what you all made! Please show me!
Love this idea, will certainly use it myself sometime :) Thank you for sharing :)
ReplyDeleteCute idea!!! Love all!!! tks. for sharing...
ReplyDeleteThis is just 2 cute! Thanx 4 sharing!!!
ReplyDeleteDebby, this is just so cute Ÿ I will be trying my hand at these. Thanks for the inspiration. I ♥ anything paper crafted.
ReplyDeleteThank you forr writing this
ReplyDelete