Saturday, December 25, 2010

Merry Christmas my friends!

Just a quick post to wish you all a very merry Christmas and a joyfull, happy and healthy 2011 for you and your loved ones. Now getting back to Christmas dinner and watching the Beethoven movie with DS Joram.
This is my first ever white Christmas in this little country of ours. And we are talking WHITE! There's about 12" of snow here and there is more to come.
Take care of yoursleves and thanks for being around, reading my blog and being my friends, it means a lot to me!
Stay safe!

Thanks for stopping by!

Monday, December 20, 2010

Scrapping with recycled items

This weeks challenge at Let's Scrap is a real fun one: Use recycled items. I had this tag in my stash for such a long time. It came from a dress shirt I bought a long long time ago and I have always wanted to use it on a layout but never got around to it. So this was the perfect challegne for me. The tag contained two parts: A piece of ribbon with 'with a touch of silk' on it and a piece of organza with 'avec une touch de soie' (with a toch of silk in French) on it. The organza piece even has a rhinestone on it.
Last week I shot the perfect pics for this layout.

Chipboard: Making Memories
Rhinestone title: Me and my Big Ideas
Ticket: Silhouette print and cut
Pearl flower: Basic Grey
Glitter: K and Company
Butterflies: Silhouette cutting file
Misc: Bling, sequins, homemade glimmermist

If you want to see the tutorial for my homemade glimmermist please read HERE. I am always amazed how good it works. I only bottle of the 'real' stuff I bought is the Marshmellow White. I saved soooo much money on this idea! (which I can spend on more scrapbooksupplies, ha!)

The weekend is almost over. Enjoy this last week before Christmas. Don't let the stress take over. Try and relax while doing your last minuyte shopping by going for a cup of coffee at you favorite place! Just sit for half an hour and read a magazine or something. Those 30 minutes won't do anything to your schedule, trust me!  

Saturday, December 18, 2010

Stamping on your layout

This may sound very familiar to quite a bit of scrappers and cardmakers. There are so many supplies I have and don't really use. For example: STAMPS! I have so many stamps, foam stamps, clear stamps and even the old fashioned mounted ones. And when do I use them? Hardly! Actually, I probably must say NEVER because most of them are still unopened. Shame on me.....................

So this weeks challenge at Let's Scrap was a good one for me: Use stamps on your LO. Well, I got out my foam stamps and used them for a title on this LO. This pic was taken during our stay in Croatia last May. There's actually a funny story to this one. I was going to take a pic from DH Richard while he and DS Joram were palying mini golf. I was entertaining DD Jinte and shooting some pics. I took this pic and I was kind of annoyed because he suddenly looked up. So the shot I had in mind was totally ruined.
But a couple of minutes later this turned out to be one of the best pics! DH was actually looking up because he felt something on his shoulder. He looked up and did not see a thing. Okay, done deal, move on with the game. A bit later it turns out that a bird pooed on his shoulder! So the pic I took was timed so well!
I am still going for all my leftovers for the layouts I am making. I am a fan of combining patterend papers form different manufacturers and for this one I used three different paper lines by three different manufacturers.

Cardstock: Bazzill
Patterned paper: Cosmo Cricket, Rusty Pickle*, Daisy D's*
Rub-ons: Basic Grey
Stamps: Making Memories, Creative Impressions
Misc: Bling

* These companies do not exsist anymore (talk about using up your stash.................)

And to top it off: I won this challenge! Thanks Mandy!

Have a great weekend!


Wednesday, December 15, 2010

Card sketch Wednesday at Let's Scrap

Every third week a card sketch is posted at Let's Scrap. Even though cards are not my thing I thought with Christmas coming up it would be kind of handy to make some cards. Most of the times I transform the card sketch into a layout. But not this time. And when I see all the others cards that the DT made flying by in the gallery, I know why I usually don't make cards...............
I used Bo Bunny's Christmas line from last year. Love a ll the non-traditional colors and the playful details.

Cardstock: Bazzill
Patterned paper, die-cuts: BoBunny
Misc: Bling

Today is the last day to submit your LO's for the January Sketch contest at Let's Scrap. You can read all about it HERE in a previous post.


Have a good day!

Friday, December 10, 2010

Paper Wreath tutorial

If you arrived here from The Scrap Shoppe: Welcome to my tutorial for this years Home Made Christmas.

This would be a great home decor item for Christmas but leaving the Christmas wish behind, it would make a great all year round wreath. What about putting 'welcome' on there and hanging it on your front door? (Just make sure it won't get wet.....................)

I made this and I was amazed about how easy this was and how good the final result. I am going to try and explain to you how to make this. This is what you need:
  • Styrofoam wreath (mine was about 8" diameter)
  • Old book (I used a paperback book)
  • Pins (regular or short ones, does not really matter)
  • Ink for the edges
  • Ribbon
You don't really need the following items but you can if you want to spice it up:
  • A decoration piece for in the wreath (I used a wooden star about the size of the inner opening of the wreath, this can be your guideline for buying))
  • Glitter spray (there's probably tons of people that would say you can't, but I used glitter hairspray, I use it all the time on projects and never damaged anything and it is a frugal option)
You start with tearing pages out of your book. Don't try and do it to neatly, but do make sure you still have whole pages. I started with 50 pages and I could not really tell you how much I used in the end but you can always take more out or throw the leftovers in the waste paper (or your fire place, ha!)
Then ink the sides of your pages. Again: Don't try and do it to neat. This is a great project to let go of your perfectionism, I had a hard time with it and at the same time lots of fun.....

When you have some pages inked you can started attaching them to the wreath. I used those tiny needles that you use for decorating, but you can use whatever you have lying around. Well, as long as they don't come out the other side of your wreath I guess...................)

The hardest thing for me to explain is how to fold the pages. I tried to take pics of it, but it is always hard to takes pics of the entire process.
You start by folding your pages over lenghtwise BUT: don't really fold/crease it! You just sort of put it together without really folding it (this does not really sound too good does it? I just hope the pics are more clear than I am). When you are done folding attach it to the wreath as showed in the pic. This will be your first layer. There are three layers in total. Use as much pins as neccesary to keep the papers in place. Mine has two, sometimes three.
This might be handy to mention: Most of my pics were taken from the back of the wreath. For me it was the handiest to work on the back too, but I guess that is all up to you!

You keep putting pages on until your first layer is completely filled. Thep aged overlap a little about a 1/3" or so. Again, don't be to precise, it can be half an inch on the one and 1/4 on the other one. 
When your first layer is done we keep on moving to the second layer: This layer will be placed about two inches lower than the first one. I swear I took pictured from starting the firstl ayer too but I can't find them anywhere so you will have to do it with the pic of when the second layer is on. You can see in the pic that the second layer is much lower than the first. Again: don;t measure anything, just do it by sight. Trustm e, it will work out great. By the way: This pic below was taken from the top
When your second layer is done the back of your wreath will look like this:

And this will be the front: Again you can see that my pages are not lined up at all. How are we doing with letting perfectionism go?
If you are still with me here you are doing great, we are almost done. We are now starting the third layer. This layer will will placed overtop of the firstl ayer but than facing the other way (so outside the wreath) This will make your wreath look fuller and cover up any of the styrofoam that was still visible after the first two layers. The pic will show you where about to place the third layer and what it will look like when you're done (again: from the back)


At this point your wreath is done and you can start decorating. You don't have to if you like it like this and you can use whatever you like to decorate it. If you decide to leave it like this you will only have to attach to ribbon to hang it. I used three different kinds of ribbon and fibers and placed them just around the wreath on top and bottom.
This is what I did with the star: I inked the edges with the same color ink I used for the pages and cut a shape with my Silhouette and adhered it to the star. You can use stickers, chipboard or whatever you like on it. Just look at it like a little canvas.
I attached the star with the twine that came with it but you can use whatever twine or ribbon that you like. This is what my wreath looks like.


I would love to se what you came up with because I there can be so many different looks to this. So please let me know, or leave a so I can check it out. And I promise that I will post the ones that I know about. And if you have any questions let me know, I would be more than willing to help you out.

You can place this tutorial at your blogs but I would be very pleased if you would link back to this post and my blog!
If you like what you see here please become a follower.
Thanks for playing along.

Have a great weekend!

Wednesday, December 08, 2010

Sketch Wedsnesday at Let's Scrap


 The weather is still cold here. The snow outside turned into ice and has taken over daily life. Biking (our main form of transportation) is hard. Christmas trees are getting decorated everywhere. We are probably going to put ours on the end of the week.

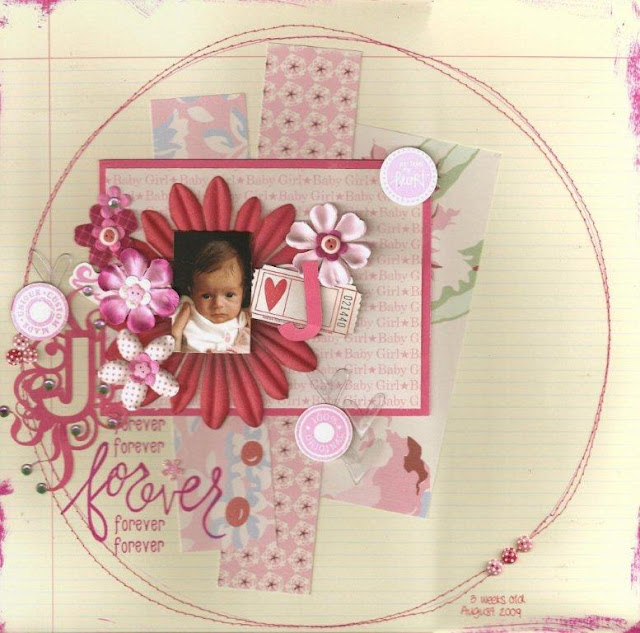
Today a new sketch was presented at Let's Scrap. This is what I came up with. The pic from DD jinte was taken when she was three weeks old (August 2009)

Cardstock: Bazzill
Stickers: Making Memories
Buttons: Do Crafts
Transparency shapes: Heidi Swapp
Stamps: Heidi Swapp, See D's
Ticket: Jenni Bowlin
Ink: Stazon
Misc: bling, sewing machine

The J's were cut with the Silhouette. The colors of the scan (the whole page) are totally off. Our printer is playing tricks on us lately. The colors are like the ones in the detailed pics. Sorry for that. 
www.tips-fb.com

Tuesday, December 07, 2010

Your layout published as a sketch?

We are having the coolest contest at Let's Scrap. If you have a favorite layout (which is not based on a sketch) you can enter in the contest. You could be the the lucky winner of your own sketch by Cheri O'Neill and a scrappy price! And the best: It is going to be one of the January sketches at Let's Scrap so all the members can use your sketch to work with. Isn't that the coolest? The submitting deadline is December 15th, so you still have time to pick your favorite layout, scan or take pics and e-mail it to Cheri!
Here are the official rules.

YOUR LAYOUTS = JANUARY'S SKETCHES!!

We are having a little sketchy contest! Send me your favorite
double-page layout and/or a card to dance@tekstar.com. Our Design Team
will vote and choose the top 3 double-page layouts and one card that
they think is OUT-STANDING! (We will be looking for fun elements and
photo placement, easily sketchablity, and overall eye-catching layouts).
Then I will make a sketch from them and post them for the January
sketches. Each winner will receive a special scrappy gift as well as
being highlighted on the main page for that week!


RULES:


**Only submit ONE Layout and/or ONE card
**All entries must be emailed to me by December 15th.
**Include your name and emailing address on your email please.


We can't wait to see your work!!!!


www.tips-fb.com

Sunday, December 05, 2010

Recycle old books while scrapping

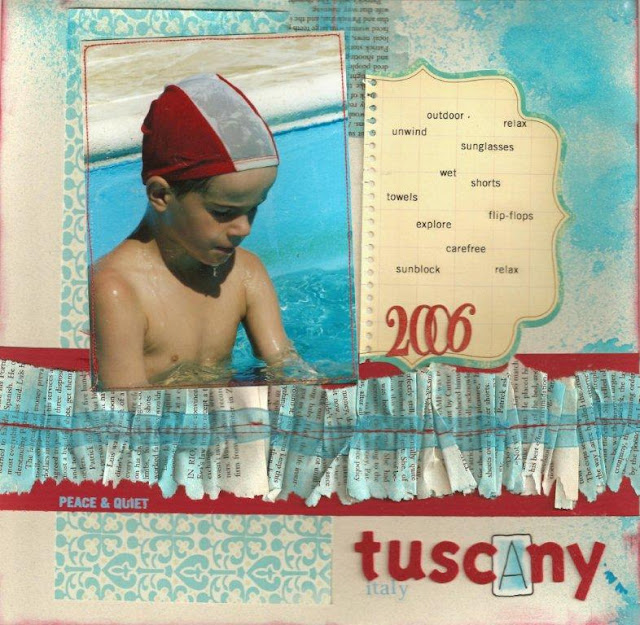
  I am always in for finding alternatives for scrapbook supplies. And then especially cheap supplies. I love how you can find cheap glitter stickers in a departmentstore in a section where you'd never expect them. My BFF found a whole shoebox full of rub-ons (the ones graphic designers use) at a garagesale for $1. This weeks challenge at Let's Scrap is all about recycling. The challenge was to use book pages on your pages. They can be used in any form, you can make flowers of them, use them as mats or even die-cut them into a title.
And I do know that there are people that will be worried about the acid in the book pages. Well, I guess book pages are not acid free but I always keep this in mind: As long as they don't touch your pics no harm will be done. And if that does not do it for you: You can always use the de-acidification spray (isn't that a nice word, if it is...................could also be de-acifying, ha!)

Before I started this layout I was already working on a project (home decor) with book pages for a tutorial at The Scrapshoppe that I will be posting later on this week. So making a layout with bookpages was a great matching project.

For this layout I used an older picture from Joram. It was taken in 2006 while we were in Tuscany, Italy. For hygienic pruposes bathing caps are mandatory in almost all pools. Well, I can tell you, when you get used to it: No problem at all. And you know what: You don't even have to worry about your hairdo when you come out of the water!

Cardstock: Bazzill
Patterned paper: Lily Bee Design
Rub-ons: Scenic Route
Journaling spot: Making Memories
Misc: My homemade glimmermist, sewing machine, book pages (John Grisham's the Partner), ribbon

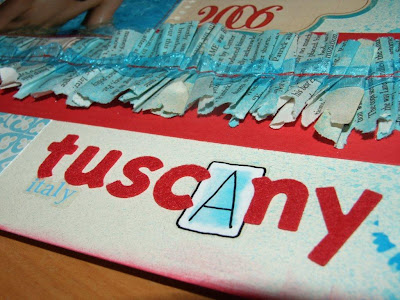
For those who have been scrapping for quite some years: Do you recgonize the A alphabet sticker in the word 'Tuscany'? If this would be an actual itme it would be called vintage or even antique. I think it is one of the very first sticker sheets I have ever bought.


For all of you: Have a great week!

Wednesday, December 01, 2010

Sketch Wednesday at Let's Scrap

As you will know by now: Wednesday is the day that a new sketch gets revealed at Let's Scrap. I really had a difficult time with this one. Not so much with the sketch but with the layout I was making with it. I used one of those Prima Marketing stud swirls and I ended up with a pile of sticky studs all tangled up. I guess my neighbours could have heard me............... But one of my Let's Scrap friends, Kathy, gave me this tip that she got at CKC: Cut them up into managable parts and then put them on your project. Thanks for the tip Kathy!


This pic I used for this layout was takien by my DH Richard when we were in Rovinj (Croatia) last May. He and DS Joram were climbing a church tower and this is the view they had from up there. I was enjoying the inside of the church (I think it was even a cathedral) with DD Jinte.

Cardstock: Bazzill
Patterned paper: DCWV
Brad: Imaginisce
Flower: Silhouette
Misc: lace border, sewing machine

The title was cut with my Silhouette and as said before: The layout is based on a sketch from Let's Scrap. If you want to join us: Please visit Let's Scrap and enjoy all the sketches, challenges and fun prices!


www.tips-fb.com